MrKen's WAV Compression Help Page
Why Compress a WAV?
This is the burning question. Why should I compress my wavs? They are fine just the way they are! Besides, if I compress them, I will lose the quality of sound!!
Okay! okay! No need to yell at me.
Losing the sound quality is true to a certain extent, however this weighs heavily on the format of compression you choose. A lot of people are choosing 4 bit compression which really makes the sound crappy for the most part. There is a better way that is more effective than 4-bit compression. Read on.
My preferred compression format is the MPEG Layer-3 WAV format. This is in fact a REAL WAV format, hence the extension *.WAV. I take all my wavs, whatever they are 16-bit, 8-bit, Mono, Stereo, 11KHz, 22KHz, 44KHz, and convert them to 32Kbit 22KHz Mono MPEG 3-Layer wavs. This format retains the sound integrity, assuming you have a good quality wav to begin with and reduced the size DRASTICALLY. As an example, I can take a 8-bit Mono 11KHz full song wav at 3+ Megs and reduce it to somewhere between 600K-900K in size. There is over a 2 MEG size reduction! That is just one example. See for yourself.
This is a full visual tutorial to compress your wavs to this new format on Windows 95 or above.
IMPORTANT NOTE BEFORE YOU CONTINUE
Not everyone has the audio codec to support this format! Wait a minute, MrKen, what the heck is a "codec" anyways? I hate it when you throw those tech terms at me!
A codec is the combination of the terms code and decoder. This is a circuit for converting audio or video signals into and out of digital format. You already have the circuit if you have the sound card, now all you need is the code to decode this format.
Okay enough of the technical hogwash. Lets have a little test run to see if your system supports this format. Click on the below wav to see if you can hear this.
SYSTEMS.WAV
If you heard that wav, then you can skip this section. If you did not hear the wav, you need to install the codec so your sound card can play this wav.
Email me for the MPEG.EXE(275K)
Once you download the MPEG.EXE, run the file to install the codec. It takes about 1 second to install and it will probably be installed before you can bat an eyelash. Now, you may or may not have to reboot for it to take effect. Now you can play the MPEG compressed wavs.
AOL USERS: Please Read
If you are a pyscho wav addict, as I am, you should already know this. AOL's WAV player will NOT play wavs that are not either 8-bit or 16-bit. It does not support any other form of compression. Period. End of story.
The moral to this story is, you MUST use one of two things to hear the wavs:
- Open it up using a Windows program. This translates to, opening it up in your Sound Recorder program or Windat. To find the Sound Recorder program, there are two ways to find it:
- Click START > then choose WINDOWS EXPLORER > then navigate to the directory in which your wav is in and double click on that wav. It should open in Sound Recorder if it is associated correctly.
- Click on START > then choose RUN > type in: C:\WINDOWS\SNDREC32.EXE and then click OK. Now click on FILE and then OPEN. Navigate to where your wav file is and open it there.
- Once you place the WAV in the correct directory (the MAIN AOL directory, that means C:\AOL30), then you can play the wav in a chatroom.
Compress your WAVS to MPEG 3-Layer WAVS: Full Visual Tutorial for Windows 95 or above Users
You can do this by either opening the wav through Windows Explorer file manager or by using the method as follows to open a wav for compression.
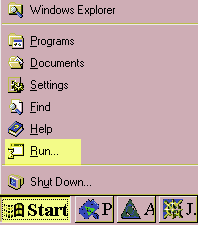
- Left-Click on the START button and choose RUN. As highlighted in yellow:
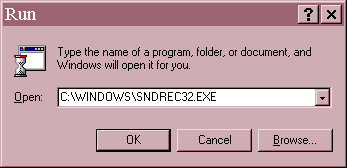
- Now, a RUN program box will appear. In the Open field, type in C:\WINDOWS\SNDREC32.EXE as indicated:
If for some reason you have this file located somewhere else and it is not found in your C:\WINDOWS directory, which would be unusual, you can try doing a search for SNDREC32.EXE or just go into Windows Explorer and try double-clicking on the wav file to see if it brings it up.
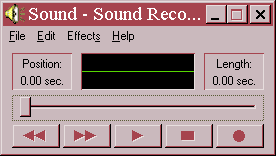
- Now click the OKAY button and you will see a Sound Recorder program box pop up as below:
- On the Sound Recorder box, click on the FILE Menu and then choose OPEN as below:
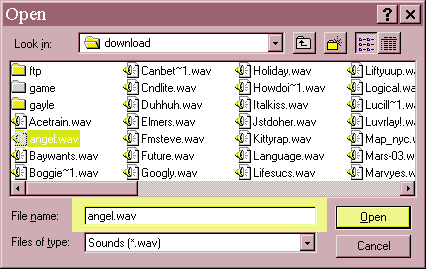
- Now after you choose OPEN, an OPEN Dialogue box will apear. Here you will navigate to the directory where the wav is and click on wav in the box as I did with the angel.wav and then click OPEN:
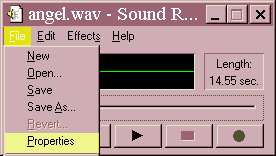
- Now I have a Sound Recorder box with the name, angel.wav on the top of it. Now that my angel.wav is loaded into Sound Recorder, I can procede to compress the wav. Now click on the FILE menu and then choose PROPERTIES as shown:
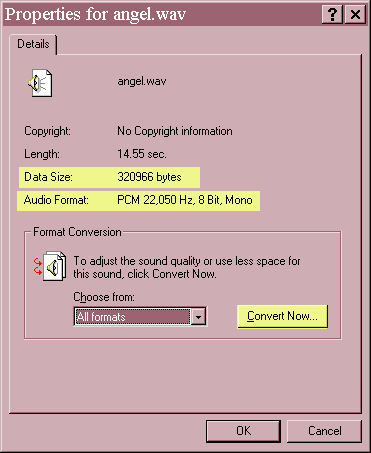
- Now a Properties windows appears. Here as you can see I have highlighted certain information. This Property windows tells you that this angel.wav is currently 321Kilobytes in size and it's current format is PCM 22,050Hz 8 bit Mono. We are going to convert this to MPEG 3-Layer 32Kbit Mono 22,050Hz and you will see the difference. Now click the CONVERT icon as highlighted:
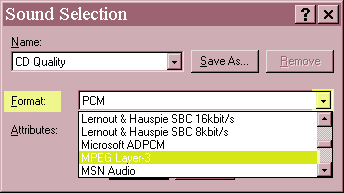
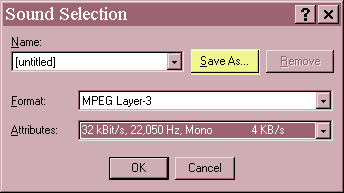
- A Sound Selection box will pop up and you need to click on the little down-arrow on the Format field and scroll down to choose the MPEG 3-Layer format as indicated:
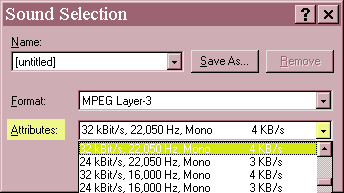
Now in the Attributes box, and select the 32kBit/s 22,050 Hz, Mono 4KB/s selection as indicated below:
- Now you should have a Sound Selection box that looks as the following. You want to go ahead and save this format as MPEG. This way next time you go to compress a wav, all you have to do is scroll down the NAMES box and find your predefined compression format called MPEG. To save this format for later use, click on the SAVE AS button:
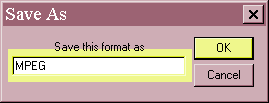
And now type: MPEG in the area provided and click OK as shown. Now your format is saved for later use under the NAMES box in the Sound Selection Box.
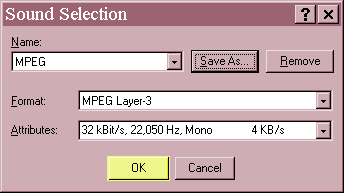
- Now your Sound Selection box should look like the one below. Now to actually convert the wav, finally, click on the OKAY button! The OKAY button converts the wav NOT the SAVE AS button. The SAVE AS Button only saves a specified format.
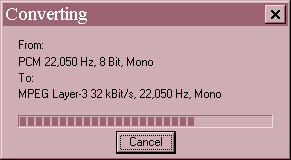
Now you will see your wav being processed as Windows converts it.
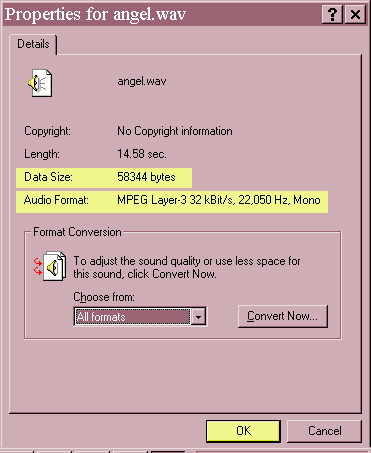
- Now, look at your revised Property window for the angel.wav. Wow! It reduced the wav to 58 Kilobytes all the way from 321 Kilobytes. You can see the Audio Format is in the MPEG format now. Now you can click OKAY and test drive the wav!
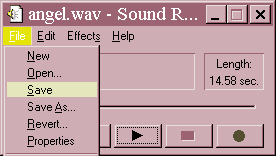
- Finally the last step, you can hear your newly converted wav by clicking the play button. If you want to save it in its new format, click on the FILE Menu and choose SAVE. Then you may exit the Sound Recorder program! You are done!
